
Adding Schema.org to a GitHub Pages site
This guide will show you how to do add Schema.org markup to a GitHub Pages site.
1. GitHub Pages
GitHub Pages are an excellent platform for creating informative websites. The hosting is (currently) free which is a huge plus; the collaborative tools allow teams (that may be widely distributed, fluctuating, and/or voluntary) to contribute in a well-structured, verifiable, and open manner; and the version control capabilities are a must in any software project. It’s becoming an increasingly popular choice to make websites with. GitHub Pages makes use of the Jekyll templating engine.
In this tutorial we will set up a new Jekyll site on which we will share our training materials, and mark-up them using Schema.org conforming to the Bioschemas TrainingMaterials profile.
2. Setting up a new Github Page site
First things first, follow this guide to setting up Jekyll and hosting it on GitHub pages. Once you’ve got the correct environment setup, you can then create a new app by running jekyll new my-tutorials.
In this tutorial we will work with a file structure like below. Something similar to the below should be generated once you generate a new Jekyll site, except for one or two difference. Firstly you can delete/ignore the folder _posts, and secondly we will add two folders called _tutorials and _layouts.
├── 404.html
├── Gemfile
├── Gemfile.lock
├── _config.yml
├── _layouts
│   └── tutorial.html
├── _tutorials
│   └── awesome-tutorial.md
├── about.md
└── index.md
Let’s create our first tutorial called awesome-tutorial.md in the _tutorials folder.
3. Adding metadata to your pages
Open awesome-tutorial.md and copy the snippet below into it. Jekyll allows you to put what’s called Front Matter at the top of markdown files in YAML syntax. Front Matter contains variables, metadata, and layout configuration options. It must be surrounded by 3-hyphens above and below. Beneath that we can add the mark-down content of the webpage.
awesome_tutorial.md
---
bioschemas:
  "@context": https://schema.org/
  "@type": LearningResource
  "http://purl.org/dc/terms/conformsTo":
  - "@type": CreativeWork
    "@id": "https://bioschemas.org/profiles/TrainingMaterial/0.9-DRAFT-2020_12_08/"
  about:
  - "@id": https://schema.org
  - "@id": http://edamontology.org/topic_0089
  audience:
    - "@type": Audience
      name: (Markup provider, Markup consumer) WebMaster
  name: "Adding Schema.org to your website"
  author: ["Fred Dibnah", "Niall Beard"]
  contributor:
    - "@type": Person
      name: "Frank Spencer"
  description: "In order to establish higher search results for online resources."
  keywords: "schemaorg, TeSS"
  license: CC-BY 4.0
  version: 1.0
---

### My Awesome Tutorial

This is my tutorial. It's great because
- It's free
- It's on Github Pages
- It's got Schema.org
- I made it
Here we define how to render the page (Line 2), what our metadata is (Line 3-18), and what the page contents will be (Line 21-27).
The first two properties specify which vocabulary we are using and what type of resource we are marking up - the LearningResource type ("@type": "CreativeWork") from the Schema.org vocabulary ("@context": https://schema.org/).
You will use a different schema type depending on your page is about (e.g. "@type": "Event" for events, "@type": "Dataset" to describe a page containing a dataset, or "@type": "Recipe" to describe a potato salad).
Lines 6-18 is a list of key-value pairs. Each key is a property of the LearningResource type (e.g. keywords, description, name) along with its value (e.g. “schemaorg”, “In order to establish…”, “Adding Schema.org…”). The full list of properties, the expected types, and examples on how to use them are all available on the vocabulary page https://schema.org/LearningResource. To simplify knowing which properties to use, Bioschemas have developed a usage profile with the most important properties listed.
We’ve also added layout: tutorial to our YAML. This tells Jekyll (the underlying framework) that this page should be rendered as part of a HTML layout template called tutorial.
4. Rendering your Metadata
Let’s create a new folder called _layouts and have a new empty file called tutorial.html inside. This is where our HTML template used to render our tutorial will be.
Open tutorial.html and add the following:
tutorial.html

<!DOCTYPE html>
<html>
  <head>
      <script type="application/ld+json">
         {{ page.bioschemas | jsonify }}
      </script>
  </head>
  <body>
     {{ content }}
  </body>
</html>
This will be the basic layout of on any page that specifies layout: tutorial in it’s YAML.
When loading a page that specifies this layout, Jekyll will render tutorial.html and inject the contents (Line 21-27) where the {{ content }} tag is. The metadata defined in Lines 2-18 can all be access by their keys.
To render our markup we pass the bioschemas metadata to the jsonify function. This will convert our bioschemas keys and values into one of the Schema.org supported data-formats; JSON-LD.
To test your page, you can start the jekyll server by running jekyll serve and navigate to 127.0.0.1:4000/tutorials/awesome-tutorial.html in your browser to see your resulting website!
(for help see GitHub pages documentation)
5. Testing your Deployed Markup
On your tutorial page, right click and view the page source.
If all is well, you should see your markup data as a JSON-LD block inside the HTML head tag. To test whether this is formatted correctly, you can then go to Google structured data testing tool and copy the HTML in.

Once you have created a website that is publicly available online and is correctly formatted with JSON-LD, you can go to the Google Search Console and see more statistics about what and how Google has indexed the metadata on your site.
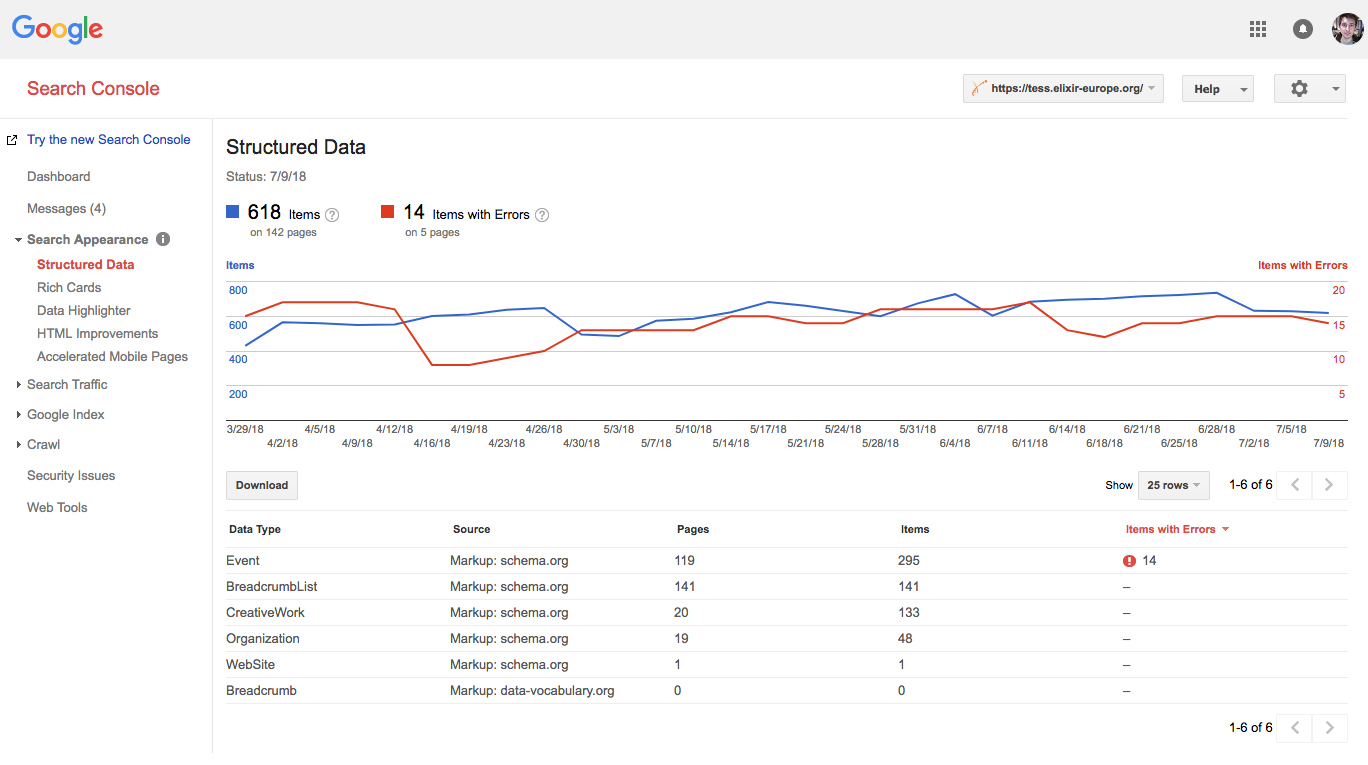
In the Search Console you can request re-indexing when your Schema.org is setup, view the error rates, and see how people are finding and using your site.
6. Making better use of the metadata
If anything about your training material changes (add a new author, rename it etc), you would have to change both the content and the Front Matter. But one of the advantages of structuring data into a machine readable format is data becomes very accessible and re-usable.
So instead of duplicating information, we should use the metadata to form the view that website users see. Go back to _layouts/tutorial.html and add some more template code to render the metadata variables within the HTML.
tutorial.html

<!DOCTYPE html>
<html>
  <head>
      <script type="application/ld+json">
         {{ page.bioschemas | jsonify }}
      </script>
  </head>
  <body>
     <h1>{{ page.bioschemas.name }}</h1>
        <p>by {{ page.bioschemas.author | join: ' and ' }}<br/>
        <i>{{ page.bioschemas.about }}</i></p>
        <p>This tutorial is aimed at:
          {{page.bioschemas.audience.first.name}}</p>
          <hr/>
       {{ content }}
  </body>
</html>
Keywords: schemaorg, TeSS, GitHub pages
Topics:
Audience:
- (Markup provider, Markup consumer) WebMaster, people deploying GitHub pages
Authors:
Contributors:
License: CC-BY 4.0
Version: 2.0
Last Modified: 22 July 2021