
How to create a new Bioschemas profile
In this how-to, we will guide you through the necessary steps to create a new Bioschemas profile. The next tutorial will tell you how to add it to the DDE.
1. Before you start
Profiles are developed within working groups. Before starting on a new profile, the Working Group Leads should create a new issue on the GitHub issue tracker to discuss with the Steering Council the need for the new profile. This will require providing use cases that the profile is aimed to satisfy. For full details, please see the Bioschemas Governance document.
1.1 Use Case Development
The use cases should be captured in a Markdown file that can be added to the use case collection. Bioschemas use cases tend to focus on search scenarios, but some also support lightweight data exchange.
A good use case will be specific about what is needed as input and what is expected as output. For example, in the following pattern you would fill in specicifics for the X, Y, and Z.
Alicia is looking for an
Xby using termsY. To enable Alicia to distinguish between returned resources, propertiesZare provided in the search results.
The use cases are helpful to identify the properties required and what cardinality level they should be within the profile. As a rule of thumb, search terms are at the Minimal Level, diambiguation properties are at the Recommended Level, and other properties of interest are provided at the Optional Level.
1.2 Cross-walk over Existing Terminologies
There are many existing terminologies within the life sciences. The aim of Bioschemas is not to replace these, but to provide a lightweight set of terms that support the discovery of resources on the Web. The Bioschemas types and properties should be inspired by and reuse as much as possible the existing terminologies from the domain.
The attributes that have been identified through the development of the use cases should be captured into a Crosswalk GSheet (template) within the Bioschemas Specification GDrive folder. The first three columns allow for capturing the property, a description of the property, and the expected type of the values for the property.
The remaining columns in the spreadsheet are for capturing releated properties from existing relevant terminologies. For each relevant terminology, the working group should identify which properties in the terminology correspond to those identified in the use cases and populate the corresponding cell with the terminology property name/identifier.
Once an initial version of the crosswalk is complete, you can start to develop your profile. However, the crosswalk should be a living document and updated with new termology terms as required.
2. Profile Development Process
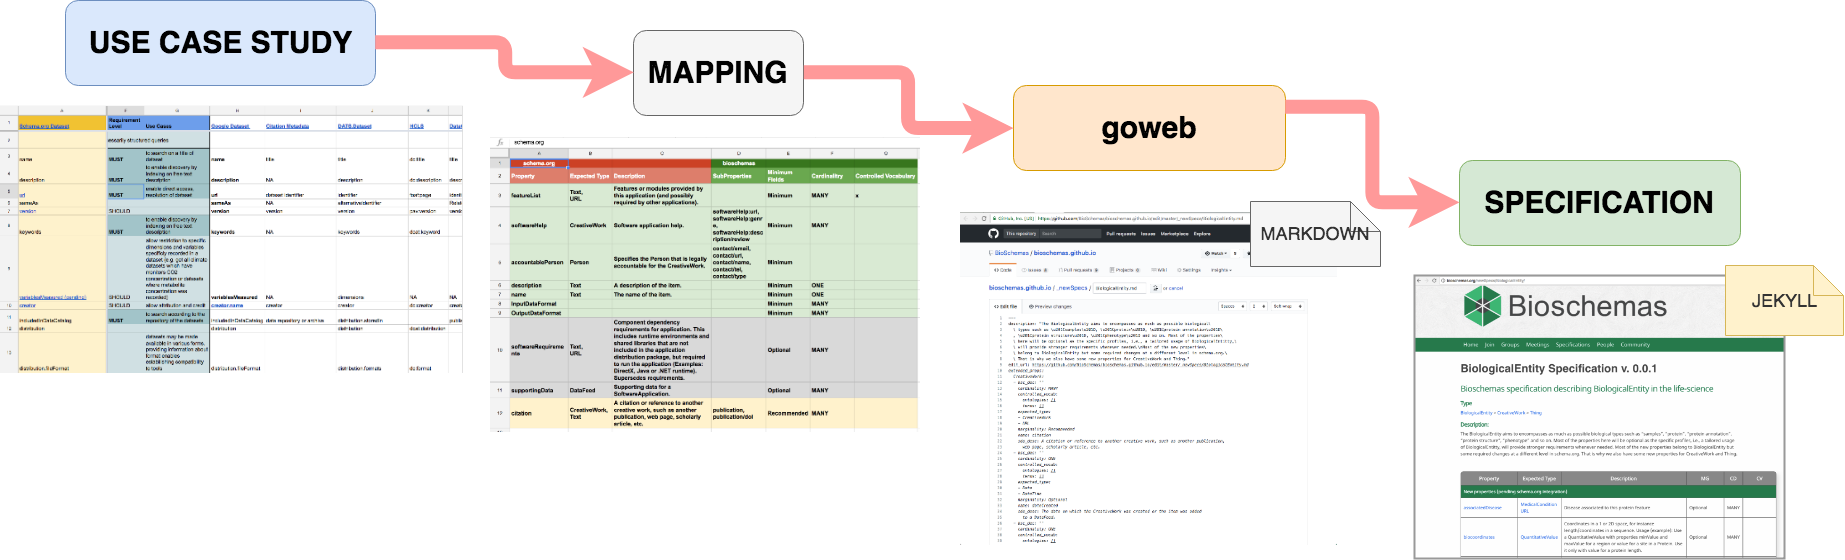
The development steps for a profile are shown in the image above and outlined below:
-
Identify the base Schema.org type for the profile, or develop a new Bioschemas type; see the Create a New Type tutorial
- For each property defined for the type use the DDE to create the profile; see the Create a New Profile with the DDE tutorial for details
Note that the properties
@id,@type,@context, anddct:conformsToare automatically added as minimal properties to all profiles.-
Decide its cardinality recommendation (minimal, recommended, or optional) based on the defined use cases, with a goal of having no more than 6 minimal properties;
-
Identify, where appropriate, controlled vocabulary terms from existing domain vocabularies to use as values for the property;
-
Provide an example of the usage of the term;
-
Map the property to widely used ontology terms in the domain;
-
Optionally provide a clarification description of how to use the property within the Life Sciences (NOTE: Note that this can only narrow the definition within the life sciences community, not redefine the property.).
-
-
Ensure that the use case is sufficiently covered, and if required propose new properties for the type;
-
Publish the profile to the draft section of the Bioschemas Profiles page, each published draft should have a unique version number;
-
Validate the profile with sample markup;
- Deploy markup conforming to the latest draft on at least two resources.
3. Final Remarks
Once you have completed a first draft of the profile, you are ready to create it in the DDE and get it published onto the Bioschemas website in the draft profiles page. The steps for this process are given in the Create a New Profile with the DDE tutorial.
3.1. Profile Authorship
When the profile is rendered on the Bioschemas website, the membership of the working group is used to determine contributors to the profile. All members of the working group are assumed to have contributed to the profile.
3.2. Markup Examples
Examples of markup are stored in the Bioschemas Specification Repository. A new folder needs to be created for the profile which should contain the following substructure:
examplesfolder which itself should contain a subfolder for each draft version of the profile with examples that correspond to that version of the profile draftjsonldfolder which is where the output of the DDE should be stored
3.3. Issue Tracker
Issues should be added to the issue tracker in the Bioschemas Specification Repository. A new label should be added for the profile that follows the common pattern used already. For example, when the disease profile was created the following label was used https://github.com/BioSchemas/bioschemas/labels/type%3A%20Disease
Keywords: schema.org, markup, structured data, bioschemas profile
Topics:
Audience:
- (Specification developer) People interested in creating a new Bioschemas profile
Authors:
Contributors:
License: CC-BY 4.0
Version: 2.0
Last Modified: 29 November 2022